

Philipp Stahl – skilled master painter and application engineer at Festool – shows us how a meticulous refurbishment with the appropriate expertise can truly work wonders in window restoration.

Renovating windows is a complex task. This is particularly true in the conservation of cultural heritage, but is also increasingly the case for the modern and sustainable handling of existing materials like wood. A meticulous refurbishment with the appropriate expertise can preserve a window construction for many more years of use.

Pfau Joinery from Pfungstadt (near Darmstadt/Frankfurt am Main, Germany) worked on windows up to five metres high in the Grand Ducal Palace of Darmstadt. Every single window is examined, repaired, sanded and then painted so that it shines with renewed splendour
The professional renovation of old windows is normally a complex endeavour for the craftspeople who are tasked with this. So it’s all the more important to give thought to the work well in advance and to make decisions based on sound knowledge and, ideally, on experience – not theoretical, but practical.
Suppose you’re suddenly presented with a hundred-year-old window in need of restoration. A tricky task. After all, a window that has aged gracefully has more than earned the right to be treated with care – not to mention the pretreatment and aftercare.
A little forethought goes a long way
First and foremost, care means preserving as much as possible of the original material. The same applies, of course, to window constructions in typical old buildings in need of modernisation. Before a window renovation begins, it is essential to assess its current condition in advance.
This is easiest to do if the window is removed and placed on a suitable underlay so that it can be examined in close detail: Where are defects present? How badly is the paint peeling off? Is the window putty still intact? Can the frames still be used? How much of the frames can be preserved? How old is the wood and the coating? What kind of coating system is in place?
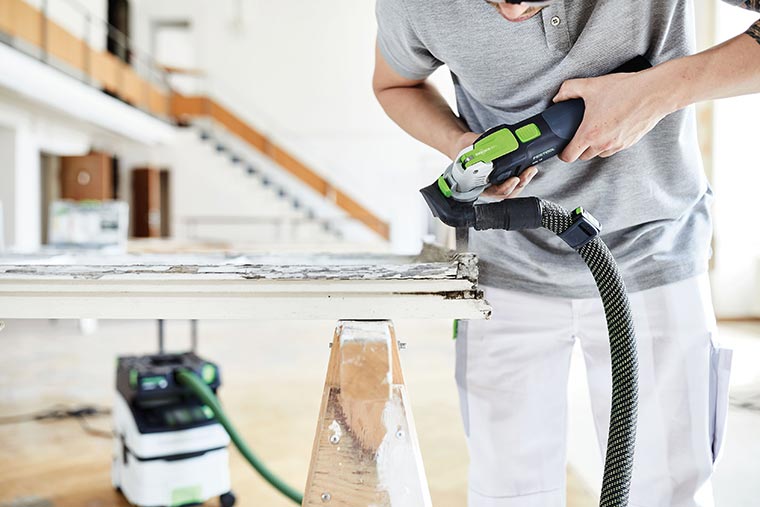
With the VECTURO OSC 18 cordless oscillator and the Starlock universal saw blade, unstable and rotten wood can be removed easily and sparingly.
Step by step: good thinking
“Old coatings that are no longer intact and loose sections of wood need to be removed or, if necessary, rough-sanded for closer examination. Areas of failed adhesion or defective knotholes have to be removed first.
A particularly good way to get this done quickly and accurately is with the VECTURO OSC 18 cordless oscillator,” insists Philipp Stahl – skilled master painter and application engineer at Festool. “If you meet resistance when cutting, it’s advisable to ease off rather than use force because too much heat doesn’t do the old wood any good.

Where necessary, old window panes should be removed. The VECTURO cordless oscillator in conjunction with the StarlockMax segment saw blade can also be used to remove the window putty completely

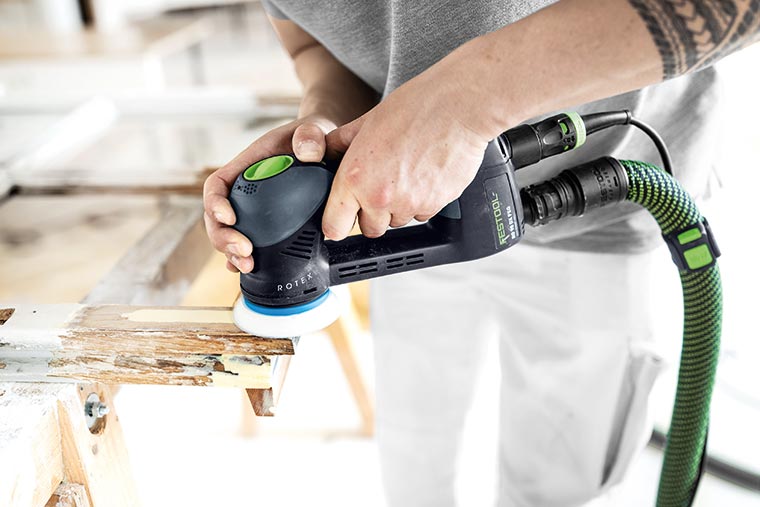
Application engineer Philipp Stahl recommends removing the old coating from the defective area using the ROTEX RO 90 geared eccentric sander set to “coarse” for heavy material removal
Going full speed ahead isn’t necessarily the best way to reach your goal. And that applies to oscillating as much as it does to the sanding work that comes after it. Of course, the aim of coarse sanding is to remove material, whereas fine sanding is all about the quality of the sanding finish. Yet there are subtle gradations in between.
Application pressure and speed control are excellent ways to adapt to the work,” says Stahl. In terms of technology and ergonomics, the VECTURO has everything you need for sawing, parting, scraping and cutting. Yet more importantly, however, it makes working in each of these applications every bit as easy as it is precise. And it starts with adding and changing attachments. In this regard, Festool trusts in the innovative tool holder StarlockMax.
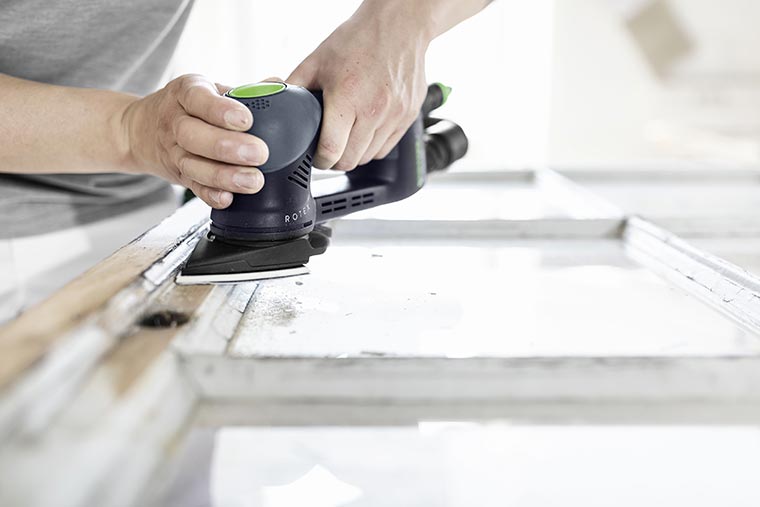
For fine sanding, simply set the RO 90 to “fine”. In addition, the sander can also be fitted with the delta pad quickly and without any additional tools, which enables craftspeople to sand narrow rebates and corners on the windows without any fuss
Thanks to the intelligent quick-change system, the saw blades can be changed in under three seconds with no additional tools required: Simply release the clamping lever, eject the tool, position the new tool and click it into place.
Fast and safe working
The cordless oscillating tool with StarlockMax tool holder works as a system to provide 100% power transmission and maximum work progress. “This means that, when sawing, cutting or making ultra-precise plunge cuts, you can work even faster and more accurately. As an addition to the positioning accessories, we’ve developed a dust extraction device specifically for the cordless oscillator. Dust-free working is therefore possible in any situation without your view of the cut being restricted,” Stahl explains.
“Particularly practical: The battery pack is not an intrusive clip-on module, but is instead incorporated ergonomically in the handle. The brushless EC-TEC motor is impressively smooth-running and its speed can be electronically adjusted with stepless control. Just like the gear unit, it is connected to the case by means of elastic damping elements, an arrangement that reduces vibrations to allow continuous use for up to eight hours.”
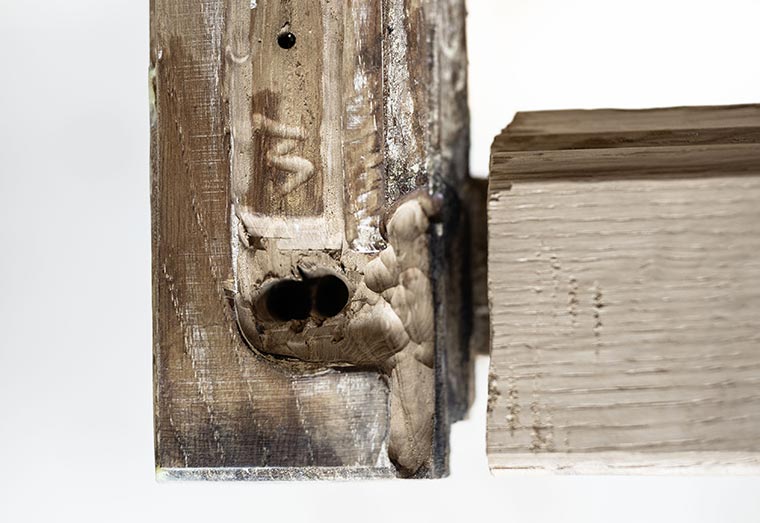
After old coatings and the defective material have been removed, it is advisable to inspect the condition of the repair area once more
Working on windows: no problem with the right equipment
The next work step, where necessary, entails the meticulous removal of the window panes. “For the complete removal of the existing window putty, the cordless oscillator in conjunction with the SSB segment saw blade proves ideal,” Stahl advises.
“For the next work step – the removal of the old coating in the defective areas – we recommend the ROTEX RO 90 geared eccentric sander with the four functions of coarse and fine sanding, polishing and delta sanding.
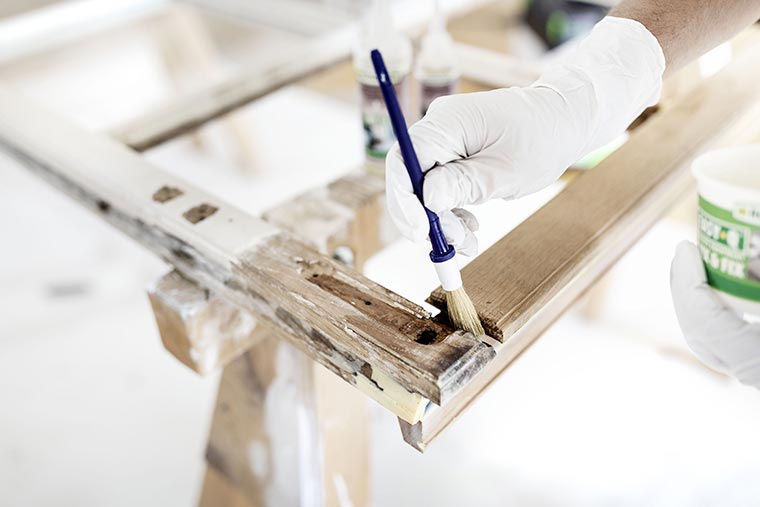
For the rebuilding of the window, the best way to start is by applying the DRY FIX UNI wood stabiliser from Repair Care with a soft brush. This increases the adhesive strength of the coating and the lifespan of the wood

The next step is the two-component wood repair compound: It is advisable to mix the DRY FLEX compound on a smooth surface using a putty knife
“In the coarse setting, the gear drive is engaged, providing excellent material removal capacity and ensuring the fast and effective eradication of the old coating. For finer material removal, you set the RO 90 to fine.
Intact coatings can then be lightly sanded and roughened for subsequent coatings. For corners and rebates, the delta sanding pad can be fitted without any additional tools. In this way, the same tool can be used to sand or roughen the surface in every corner.
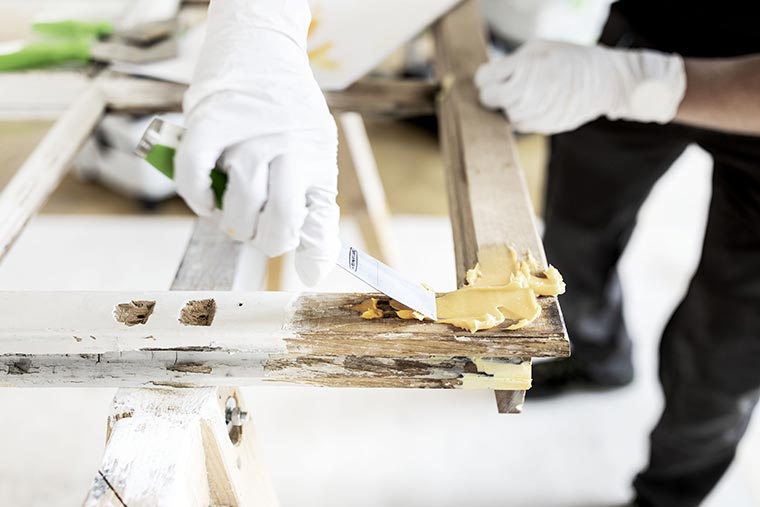
The repair area is now filled with DRY FLEX compound and worked to a smooth finish with the putty knife – and the same applies to knotholes
As window frames and casements have few flat surfaces and many edges, the sanding disc size and geometry and the material removal capacity of the RO 90 make it ideal for window restorations. “It’s right here that the RO 90 demonstrates its advantages over hand sanding or other types of sander. I know that sanding by hand is very popular at this point but, in the long run or with too many window frames, it isn’t particularly effective. Also, particular care is called for when sanding close to the edges on windows – whether by hand or with a sander.
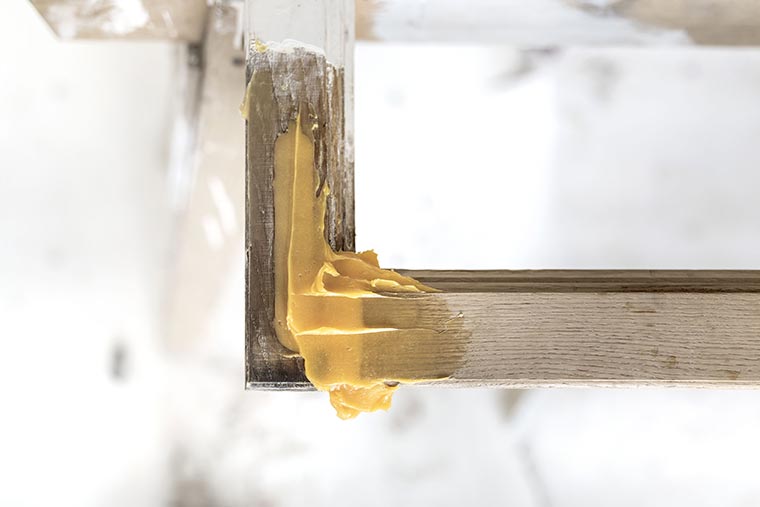
Work the DRY FLEX smooth and make sure that the voids are completely filled in with no inclusions of air
“For precisely these kinds of applications, we recommend the use of our protectors. These protect against damage to the window pane. From experience, we craftspeople know that sanding damage to the glass is difficult to rectify afterwards.
The same applies to silicone joints, by the way, because once these are damaged, they almost always need to be completely replaced – and then it starts to get really expensive,” explains application engineer Stahl.
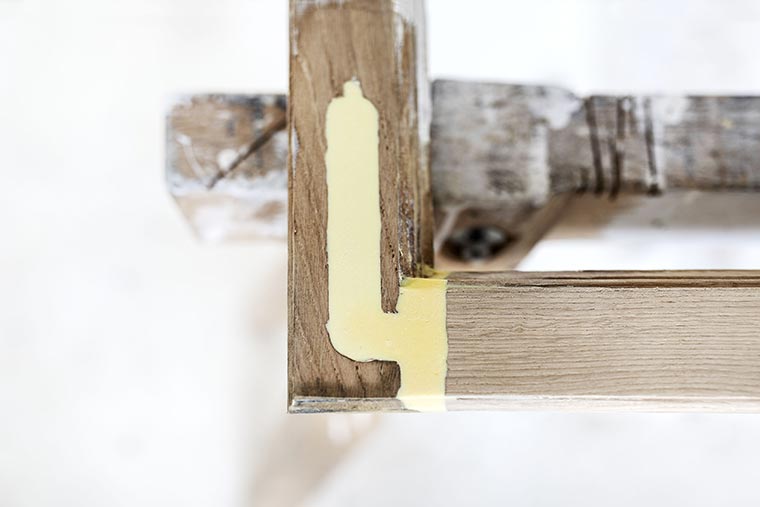
After it has been sanded level, the worked area should be inspected: The most important factor is a flat surface on the transition between the wood and DRY FLEX wood repair compound
After the DRY FLEX has sufficiently cured, any excess build-up can now be sanded level. Stahl recommends using the ROTEX RO 90 geared eccentric sander set to “coarse”
Rebuilding the defective areas
After the old coating and defective material have been removed, the condition of the repair areas is inspected again. “For the rebuilding of defective areas on windows, we’ve discovered that the system from Repair Care combined with our own system solutions delivers optimum results,” says Stahl.
Following the condition inspection, the DRY FIX® UNI wood stabiliser is applied to the defective areas with a soft brush. This strengthens the adhesion of the subsequent DRY FLEX® wood repair compound and thereby prolongs the life of the window. For application of the wood repair compound, the two components are mixed with a putty knife on a smooth surface.
The repair area can then be built up with DRY FLEX and worked to a smooth finish with the putty knife. Afterwards, the DRY FLEX wood repair compound is worked smooth across the defective area. It is essential to ensure that the voids are completely filled in with no inclusions of air. After the wood repair compound has cured, any excess build-up can now be sanded level.

Finally, the primer, undercoat and top coat are applied by brush or roller – several steps might be necessary in some cases.
“We recommend using the ROTEX RO 90 with the “coarse” setting. After sanding, the worked area should be inspected once again. Particular attention should be paid to the transition between the wood and DRY FLEX wood repair compound. It must produce a flat surface,” Stahl explains.

If windows need renovating and there is no power source nearby, the new SYS-PowerStation can quickly remedy this situation – for any kind of corded tool
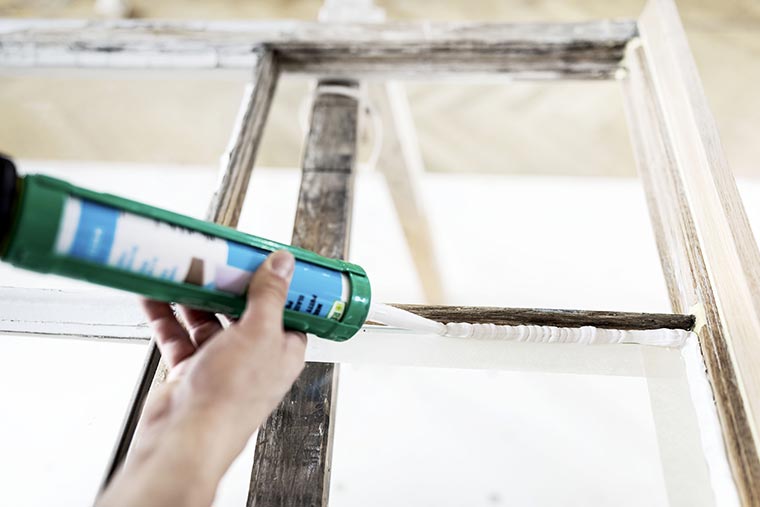
Before the pane is fitted, the rebate must be primed and the DRY SEAL® window putty applied in the rebate with a cartridge gun. After this, the pane can be fitted and the second layer of the DRY SEAL window putty applied and smoothed to a water-repellent finish. The finishing touches involve the obligatory primer, undercoat and top coat or paint, which can be applied by brush or roller.

For perfect renovation of windows: The ROTEX RO 90 geared eccentric sander in combination with the SYS-PowerStation – perfect for when there is no power socket nearby
Modern and long-lasting window restorations are today subject to quite different stipulations, often also from a cultural heritage point of view: We preserve what needs to be preserved. It is crucial that all craftspeople approach the work with great care backed by professional experience.
A comprehensive and high-performance feature set for tools – stationary and mobile – helps craftspeople to carry out their work successfully and efficiently with utmost attention to detail. If windows need renovating and there is no power source nearby, the new SYS-PowerStation can quickly remedy this situation – for any kind of corded tool.
www.festool.co.uk/knowledge/refurbishing-old-doors-windows
All images © Festool GmbH